
Memberships has a native CSV import / export that will allow you to:
- import a CSV of your members to update or merge membership data
- import a CSV of members to create new memberships (and even create new user accounts if needed)
- export all members, or export members based on status, plan, start date, or expiration date
- export selected members to CSV using a bulk action
This document will show you how to import or export members using the native Memberships import and export capabilities, along with creating memberships for existing users.
If you want to export members to move them to MailChimp, check out MailChimp for Memberships, which will automatically sync your member list with a MailChimp list and keep it updated as members change status.
Importing can be seen as a bulk create / edit for members, while exporting can help you get member data for your email service or other services connected to your site.
Developers: You may also want to check out this community plugin to add CLI support for imports, which imports via command line for large data sets, and our REST API documentation, which lets you read user membership data.
Exporting members
You may want to export members to an external service, such as an email service, to segment your newsletters by status or plan type (MailChimp users may be interested in MailChimp for Memberships instead). You may also use a member CSV to export members, make changes, then re-import / update memberships. These are possible with the native exporter.
The exporter will provide several columns, such as the user membership ID; membership plan ID, slug, and name; member email; member name; and membership start date. You can view example import and export CSV files in this Google Sheet — note that there are several sheets that you can choose from at the bottom.

A quick note: when members are exported, the member_since and membership_expiration columns will show the member start and end dates (respectively) in the site’s selected timezone. You can import these members later, just be sure to select the site timezone for the import file as well.
If you would like to export in UTC time instead, you can add this small code snippet wherever you keep custom code to change the exported time:
add_filter( 'wc_memberships_csv_export_user_memberships_dates_in_utc', '__return_true' );
To export members, go to WooCommerce > Memberships > Import / Export, and ensure you’re on the “Export to CSV” tab. Here you can configure export options to export all members or groups of members.

Combinations of these settings can be used to get a customized list of members.
- Plan – Select plans if you’d like to export only members belonging to certain plans. Leave this blank to export members of any plan.
- Status – Select membership statuses if you’d like to export only members who have certain statuses (ie only “active” and “complimentary” members). Leave this blank to export members with any status.
- Start Date – You can optionally restrict the export based on the member’s start date. Add a range to export members who signed up during that date range; you can also leave ranges open ended, such as “From ___ to 2016-05-01”, which will give you any member who signed up before May 1, 2016. Leave this blank to ignore start date in the export.
- End Date – You can optionally restrict the export based on the member’s expiration date. Add a range to export memberships that expire during that date range; you can also leave ranges open ended, such as “From ___ to 2016-05-01”, which will give you any member whose membership expired before May 1, 2016. (This would also exclude open-ended / unlimited memberships!) Leave this blank to ignore expiration date in the export.
- Meta Data – Enable this to include all meta data for a membership, such as paused date, or data added by other plugins
- Separate fields by – Changes the CSV delimiter, and defaults to comma; only change this if you know what you’re doing.
Click “Export” to generate your CSV file. Note that you must keep your browser window open until the export completes; closing the browser window will abort the export.

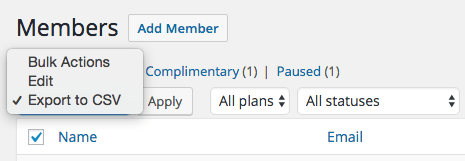
Bulk exporting members
You can also export a selected group of members from the “Members” list. Click the checkmarks next to the desired members, then select the “Export to CSV” bulk action. When you click “Apply”, a CSV export of the selected members is generated.
Troubleshooting exports
- If your CSV file isn’t generated, please double-check any export options you’ve set. You may be using option to limit the member list that do not correspond to any memberships on your site.
If these troubleshooting steps do not help you, please submit a help request and we’d be happy to assist.
Import via grant access action
Before you decide that you need to import members, you should consider using the “Grant access” action for your plans to programmatically create memberships. Here’s a good set of questions to ask yourself before determining whether you should use this or an import:
- Do you already have existing orders for purchases of your membership product? Use “Grant access” — this will create new memberships and tie them to the order record the membership was purchased in.
- Do you already have existing subscriptions? If yes, do they include the product that grants access to the membership as a line item? If so, you can use “Grant Access” to create your memberships, as both orders and subscriptions assigned to users are checked.
You can read more about how the “Grant access” action works in our user memberships document.
Requirements for import
In order to bulk create or update user memberships, you must already have the following:
- Membership Plans: You must already create your membership plans under WooCommerce > Memberships > Membership Plans. You may want to optionally create rules and other settings for your plan, but only the plan itself needs to exist to import.
- Membership Plan IDs or slugs: You want to note the ID (post ID) or the slug for each membership plan; this will be used within the import to designate which membership plan the user will be assigned to (users can be assigned to multiple plans if desired). If you do not know how to get user or post IDs from WordPress, we recommend this tutorial.
- User identifer: When updating existing user memberships, you will need a way to identify the user you want to modify. You can use the
user_membership_IDto identify an existing user and their membership plan. If you includemembership_plan_IDormembership_plan_slug, you can instead useuser_ID,user_name, ormember_emailto identify an existing member.
Formatting import CSVs
While you may be used to creating your CSVs in Microsoft Excel, we recommend against this, as Excel can add extra markup. Instead, we recommend using Google Drive / Google Sheets to create your spreadsheet, and export this as a CSV file. If you have an existing CSV, you can import it to Google Drive by creating a sheet, then going to File > Import > Upload to add your existing spreadsheet.
Once your spreadsheet has been created, you can export it by downloading as a CSV, which will let you then import into WordPress with this CSV:
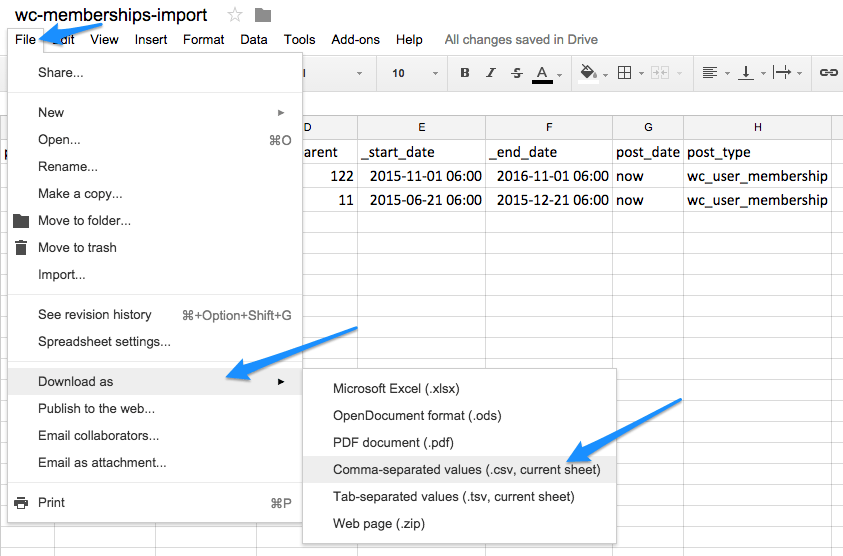
If you would like an example to work from, you can check out our example import and export CSV files and save these to work from. You can either click File > Download as > CSV as outlined above, or right-click on a specific sheet and use “Copy to” to move this to your own Google Sheet.
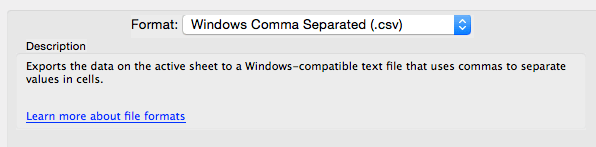
If you absolutely must use Excel, the “Window Comma Separated (csv)” format should be used, not “MS-DOS Comma Separated (csv)”.
Set up your CSV with one row per user membership. If a customer / member has more than one membership, you will need a row for each membership that should be added.
Import: column names
Your column names must exactly match the column names in this list for a successful import.
| COLUMN NAME | REQUIRED? | COLUMN DATA |
|---|---|---|
user_membership_id |
Maybe | The user membership ID can be used to identify existing user memberships, but should be left blank to create new memberships. |
user_id |
Maybe | The WordPress user ID for the member / customer. Can be used to identify existing user memberships if used with the membership_plan_id or membership_plan_slug. |
user_name |
Maybe | The WordPress username / login name for the member. Can be used to identify existing user memberships if used with the membership_plan_id or membership_plan_slug, if user_ID isn’t available. If creating users, this will be added to the user account. |
member_email |
Maybe | The email address for the member. Required when creating new users. Can be used to identify existing user memberships if used with the membership_plan_id or membership_plan_slug, if user_ID and user_name aren’t available. |
member_first_name |
No | The member’s first name; if creating users, this will be added to the user account. |
member_last_name |
No | The member’s surname; if creating users, this will be added to the user account. |
membership_plan_id |
Maybe | The ID of the membership plan for this membership (i.e., the ID for “Gold Membership” plan). Either this column (recommended) or membership_plan_slug is required for imports to process. |
membership_plan_slug |
Maybe | The slug of the membership plan for this membership (i.e., the slug for “Gold Membership” plan). Either this column or membership_plan_id (recommended) is required for imports to process. |
membership_status |
No | * The membership status for the membership — if empty, defaults to active |
subscription_id |
No | Include the subscription ID if this membership should be tied to the billing of an existing subscription record (requires Memberships 1.7+). |
member_since |
No | ** The date membership access should start / started — if creating new memberships, you can set a default start date to be used when this is blank. |
membership_expiration |
No | ** The date membership access expires; leave blank for unlimited memberships |
order_id |
No | The ID of the order in which the membership was purchased, if you’d like to link to an existing order. |
product_id |
No | The ID of the product used to purchase the membership. |
*The available user membership statuses are:
complimentary – Complimentary
delayed – Delayed
paused – Paused
expired – Expired
cancelled – Cancelled
pending – Pending Cancellation
free_trial – Free Trial
** You will be able to select whether your dates and times are in UTC or in your site’s timezone while importing.
Importing members
To import members, first be sure that you have a properly formatted CSV file ready to go. If you like some examples, check out our example import and export CSV files (there are multiple sheets you can choose from at the bottom).
Navigate to WooCommerce > Memberships > Import / Export and click on the “Import from CSV” section. This will allow you to select your import options and upload your CSV file to process.
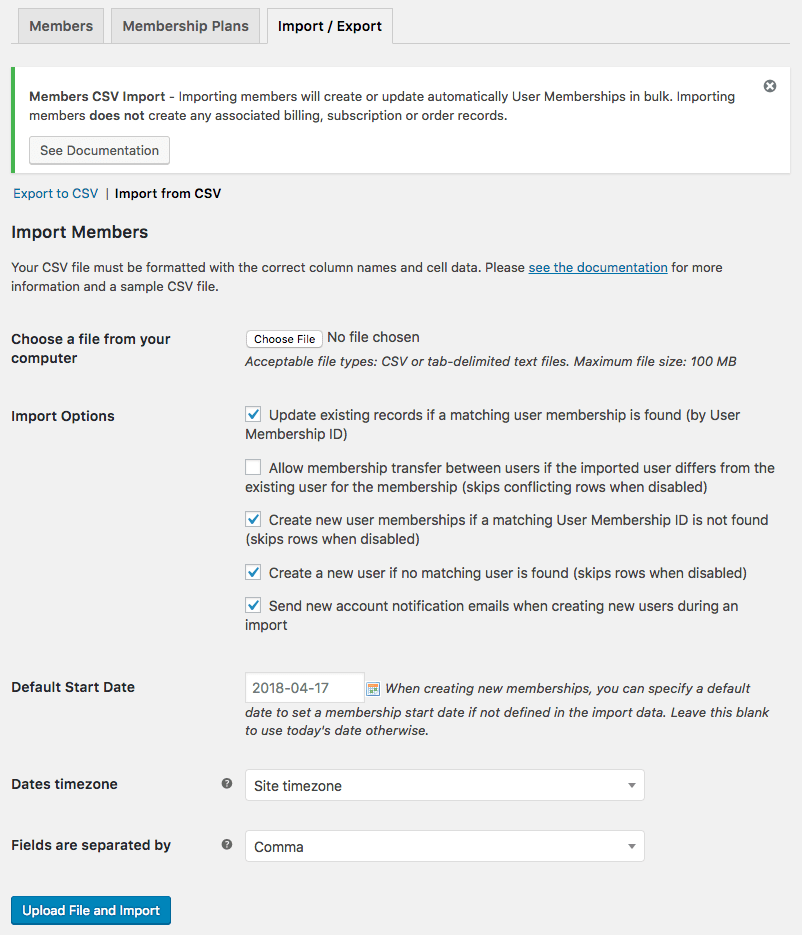
- Choose a file from your computer – Upload your properly-formatted CSV file of memberships here.
- Import Options
- Update existing records if a matching user membership is found – Enable this if you’d like to merge or update memberships from the uploaded CSV. If enabled, when the user membership ID column matches an existing membership, that membership will be updated with your uploaded data. When this setting is disabled, rows with matching user membership IDs are skipped.
- Allow membership transfer between users… (only shown if “Update existing records… is enabled) – If enabled, when a user membership is matched, but the user ID doesn’t match the current member, the membership will be transferred to the new user in the CSV. When disabled, rows that have mismatched user membership IDs / users will be skipped.
- Create new user memberships if a matching user membership ID isn’t found – If enabled, when an existing user membership can’t be located from the CSV data, a new one will be created. When disabled, rows with user memberships that can’t be matched will be skipped.
- Create a new user if no matching user is found – When enabled, if an imported row contains data that doesn’t match an existing user (user ID, username, and email are checked in order), then a new user is created and this membership is assigned to the new user. When disabled, rows without matching users are skipped.
- Send new account notification emails when creating new users during an import – When enabled, if a new user is created, they’ll be sent the default WooCommerce “New Account” email.
- Default Start Date – When “Create new user memberships…” is enabled, this field is shown. Select a default starting date for any memberships that are created via import; this default is used when the
member_sincecolumn is blank. - Dates timezone – Select whether the
member_sinceandmembership_expirationdates in your file are in your site’s timezone or in UTC. The export default is the site timezone. - Fields are separated by – Select the delimiter for your CSV file. Defaults to comma — only change this if you know what you’re doing.
When you’ve added your CSV file and selected your import options, you can click “Upload File and Import”. The file will be analyzed, and members will be imported or updated based on your settings. The plugin will then display a summary of the import for you.

Troubleshooting imports
- You see a “Could not find User Memberships to import from uploaded file.” error: This means your CSV is either missing required information, or is unreadable. Please check your CSV format to ensure the required information is present and all column headers are named exactly as they are in our table. If this is correct, please upload your CSV file to Google Sheets and re-download it, as its format is probably at fault.
- Your import dies in the middle of the process without importing all members: This most likely indicates that you’re importing a larger number of members than your server can handle. Please break your CSV file up and re-try the import, as you can import multiple times. First try breaking the import into half, then in half again, etc, until your import completes successfully. Typically you should be able to import a few thousand rows without issue, but this depends on your hosting environment.
If these troubleshooting steps do not help you, please submit a help request and we’d be happy to assist.
Frequently asked questions
Q: Can I set passwords for members on import?
A: Setting passwords if you create new users is not possible via an import file; the new user will have a password generated by WordPress.
If you’d like to notify new users to allow them to set their password after the account has been created, please enable “Send new account notification emails when creating new users during an import”.
Q: Can I add the customer’s data like the phone number to the export file?
A: The export only currently includes data related to the user membership itself. If you wanted to add additional customer data to this export file, you would need the help of a developer to modify the export file. You could consider 2 options:
- Use the Customer / Order CSV Export as a starting point, and modify the customer export query to only include users with memberships (this would give you an export of members only with all customer data, but not membership-specific data, but this could be added).
- Modify the Memberships export file via custom code to add additional columns as needed to the member export. You can find ample filters in the
/includes/utilities/class-wc-memberships-csv-export-user-memberships.phpfile to modify the export output as needed.